Measuring Website Performance Using Google Analytics Goals
H. James Harrington (of the Harrington Institute) put it best:
“Measurement is the first step that leads to control and eventually to improvement. If you can’t measure something, you can’t understand it. If you can’t understand it, you can’t control it. If you can’t control it, you can’t improve it.”
If you want to measure and improve your website performance then you need to use GOALS in Google Analytics.
In Google Analytics we use “goals” to measure how often users complete specific actions. For example – make a purchase (for an ecommerce site), completing a game level (for a mobile gaming app), or submitting a contact information form (for a marketing or lead generation site).
Marketing Consultant Paul Manwaring and author of this Google Analytics Tutorial explains more…
A Beginners Guide to Setting up Goals in Google Analytics
So you have Google Analytics installed and collecting data, well done! I bet you’re having a lot of fun looking at how much traffic you are getting to the website and where that traffic is coming from.
While this data is very useful, it will not give the Return on investment (ROI) of your marketing efforts. To get any bottom line key performance indicator (KPI) you will need to setup Goals in Google Analytics.
This Tutorial will walk you through everything you need to know to set up your goals.
How Do Goals Work in Google Analytics?
Goals in Google Analytics are your website conversions. Conversions can come in the form of sales, leads, email signups, watching a video and more. Whatever it is you want to measure as a success point, you can set up as a goal? You can then use these goals to measure how successful your online marketing is and whether you are making a return on any advertising spend. Having concrete numbers is important to justifying further investment in advertising or marketing spend.
How to Set up Goals in Google Analytics
You should now have an idea as to why setting up goals in Google Analytics is worth doing. You will not be able to optimise areas of your website or marketing without this data.
Knowing specifically what campaigns are working and not working or what landing pages are working and not working will help grow your online business faster than you could imagine. What business owner or marketer could say no to that!
This process may seem daunting but please don’t be put off by it, it really is well worth doing and a lot easier than it looks.
Here is a step-by-step guide on how to set up Goals in your Google Analytics:
1. Create a New Goal in Admin
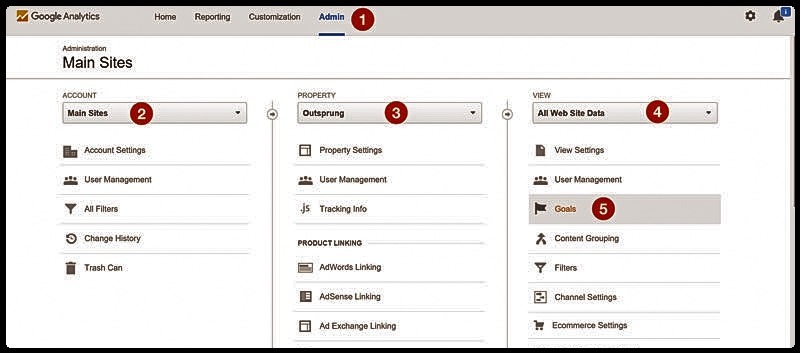
First step is to log into your Google Analytics account and select the ‘Admin’ tab at the top of the page. Make sure you are in the right account, property and view before setting up your goal so you don’t set up a goal for the wrong website if you have more than one on your Google Analytics.
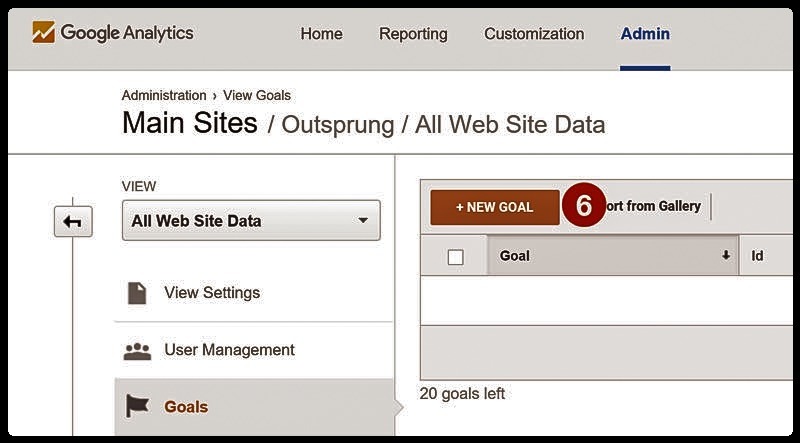
Next, click on the ‘Goal’ tab underneath the ‘View’ column. A new section should open where you will see a red button that says ‘+ New Goal’; click on this.
2. Choose Template or Custom Goal Type
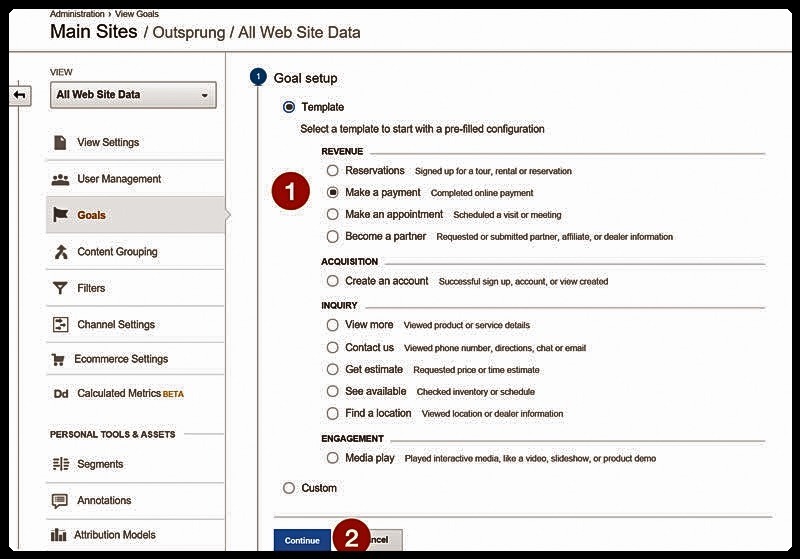
Again, a new section will open and you will see a list of options to choose from. Either choose a template or you can create a custom goal. There is no right and wrong here and if you’re unsure about any of the templates, then always go for the custom option. For this guide we have chosen ‘Make a payment’.
a. Template – These goal types were built by Google for the most common business objectives such as hotel reservations, dental appointments, phone call inquiries and even video tutorial websites. For example, an ecommerce site would choose the ‘Make a Payment’ template while a business that may want to see if their video is being viewed would choose the ‘Media Play’ template.
b. Custom – If you can’t see a template that meets your business objectives then choose the custom option. This doesn’t mean that the process will be any harder nor will it include any coding.
3. Choose the Goal Type
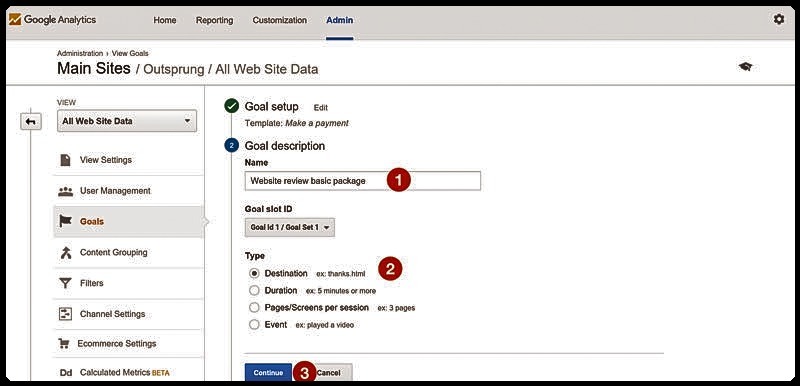
Now that you have selected your goal template and have clicked ‘Continue’, it is time to choose the name of your Goal.
Once you have picked a name that is relevant to the goal you will need to choose the goal type. There are 4 different goal types to choose from which we have explained what each is about so you can make a better decision.
(a) URL Destination Goal
This is the option to choose if you want to track how many sales or leads the website is generating by having the ‘Thank You’ or ‘Confirmation’ page as the URL destination goal. This means that every time a user lands on this page, a conversion will be counted.
(b) Duration Goal
You can use this as goal to track those that have spent a minimum amount of time (set by you) on your website.
(c) Pages/Visit Goal
Use this goal type to track how many people are visiting a number of pages (set by you) on your website.
(d) Event Goal
This can only be used if you have setup an Event in Google Analytics. You can use this to track whether users have played a video, whether they have clicked your social media buttons, have downloaded something and any other interactions.
4. Add Goal Details
How are you doing so far, still following us? Good.
After you have chosen the most relevant goal type for the goal you want to create, you will need to set the goal details. Each goal type will have its own set of details. Below, we have explained what details are needed for each goal type.
a. Destination Goal Details
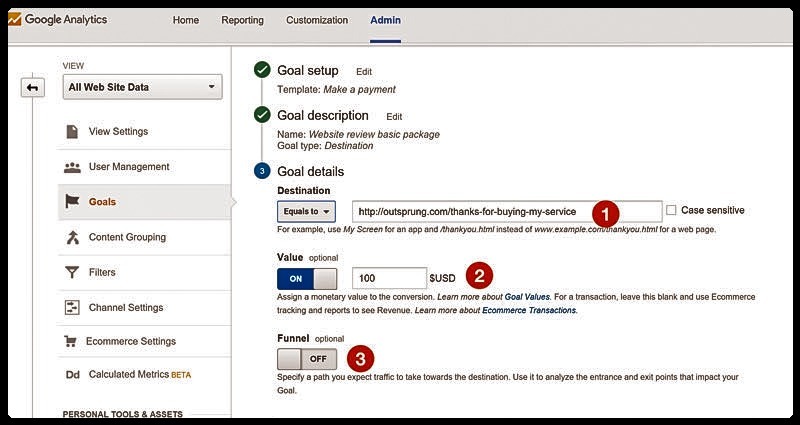
If you have selected the destination goal type, you will need to enter the URL of the thank you or confirmation page next to where it says ‘Equals to’. Don’t add the full URL of the page however, just the request URI. For example, www.mywebsite.com/thankyou.html would become /thankyou.html. You can then choose to add monetary values or create a sales funnel, which we will talk about further on in the blog post, and click save. Make sure users aren’t visiting this page for any other reason than after completing a sale or filling out an enquiry otherwise the goal data will be inaccurate.
b. Duration Goal Details
If you have selected the duration goal type, at this stage you will need to enter the hours, minutes and seconds you want to set that a user will need to stay on the site for to become a conversion.
c. Pages/Visit Goal Details
This is just as simple as the duration goal type in that you just need to enter the number of pages a user must visit to be classed as a conversion.
d. Event Goal Details
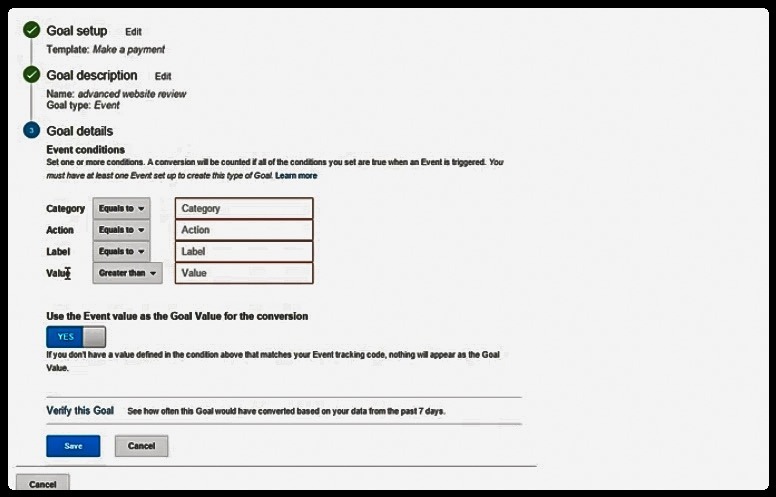
Event Goal Details which can only be done if you have setup an Event for the interaction you want to count as conversions in Google Analytics. Please see screenshot below:
=> Category – This will be for if you want to track a group of interactions such as users watching videos or downloading eBooks.
=> Action – An action is literally the action you want users to take on your website such as clicking the play button on a video or clicking a download button.
=> Label – Use this to add more details to the goal such as the name of the video or download.
=> Value – This is to measure the monetary value of the event. If you would like to keep the value the same as the event value then set the toggle to ‘Yes’. If you would like to add a different monetary value than the event value then set the toggle to ‘No’.
5. Add Monetary Value and Goal Funnel
These are optional extras and depend on what goal types you are setting up. While they are optional, the data that they provide is very useful so don’t skip on this if it is relevant to your business objective as they are both really easy and quick to set up. Here is some information as to what each are.
a. Monetary Value – Use this if you want to set a monetary value for your conversions. For example, if you have a lead generation website and are selling leads for $20 each then set the monetary value for $20 for a conversion. You will easily be able to see what your ROI is from different channels by adding a value to goals.
b. Goal Funnel – This is great for ecommerce sites that want to track how many users are adding items to the basket, proceeding to the checkout but then not completing a sale. You can use this data to help with your email marketing and also to help optimise the checking out process.
Where to View Your Goals in Google Analytics
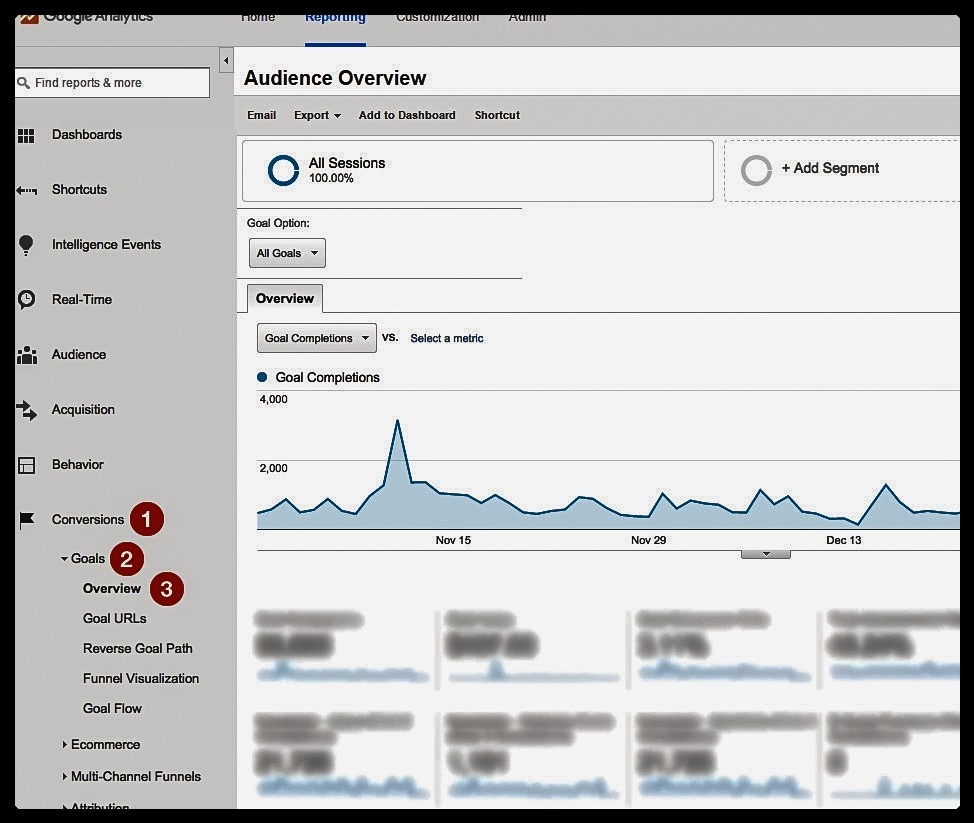
Now that you have set up your Goal in Google Analytics, you will need to know where to find this new and extremely useful data. To find the information, sign into your Google Analytics account and go to the reporting tab. On the left hand side, select ‘Conversions’ and then ‘Goals’ underneath it. You can then select ‘Overview’ which will show a page to the right of the navigation. Here you’ll be able to see how many goals have been completed during the period of time you are on, the conversion rate and where those goal completions have come from.
There you have it…
You should now have all the data you need to optimise landing pages and marketing efforts to achieve better conversion rates and a higher ROI. Don’t be intimidated by all the different options there are as setting up goals doesn’t take that much time and is actually a fairly easy process. The data you will get from it is well worth it so don’t put it off any longer, do it right now!
About Paul Manwaring
Paul Manwaring is the founder of Outsprung, a multi-disciplinary design and marketing agency based in London. Their aim is simple; to help small businesses and bloggers grow. He has a background in graphic design and UX design and has consulted over 1200 websites through his website review service.
More About Google Analytics…
Google Analytics For Bloggers – The Definitive Guide
Making The Most Of The Google Analytics Intelligence Feature
“Perhaps what you measure is what you get. More likely, what you measure is all you’ll get. What you don’t (or can’t) measure is lost”
– H. Thomas Johnson



![[GET] Polaris for Google Analytics](https://seo.maxiaodong.com/wp-content/plugins/wordpress-23-related-posts-plugin/static/thumbs/2.jpg)

