
It consistently takes me six hours to write a blog post.
In a comment last week, Nick Messenger asked me about this figure and how I write. I gave you a little bit of insight into this process in How to Write a Legendary Blog Post, but I haven’t given you the exact order in which I do things.
So, here it is. For every blog post I write, I go through these five steps. As a result, Google sends me tens of thousands of people every month.
Step 1: Researching (1 Hour)
Start with a topic. For instance, the topic of this post is, “blog post writing process.”
Then, before I write a single word, I do about an hour of research:
Conduct Keyword Research
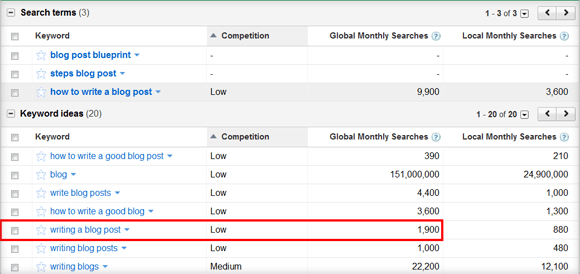
Once you have a topic, focus on nailing it down into a high search, low competition keyword. I use the Google Keyword Tool.
Take the topic and turn it into a keyword because you want the post to rank for the keyword that people actually use, instead of your best guess. Also, find a low competition keyword so you have a better chance of ranking for it.
When I started researching this post, I checked “blog post blueprint,” “how to write a blog post,” and “steps blog post.” Through that, I found that “writing a blog post” is another good keyword for this topic.
Research the Keyword
Once you have a few good keywords, google them.
- To see the actual results.
It’s good to see the headlines and metadata for the posts that sit on the front page so you can improve upon them. - To read what others have written.
Your goal with a blog post is to create an ultimate resource for that longtail keyword. The best way to incorporate various viewpoints on your topic is to draw inspiration from what other people have already written. If I use someone’s exact thought, I’ll link to it like I did in this post.
After googling the four keywords for this post and reading through a few of the articles (most of them weren’t very good), I decided on my primary and secondary keywords for this post.
Primary: Step-by-Step Guide Writing Blog Post
Secondary: Writing a Blog Post, Steps Writing Blog Post, Guide Writing Blog Post
(Click the links to see how this post is doing in the real-time search results.)
I chose not to write for, “how to write a blog post” because, despite the Keyword Tool listing it as low competition, there are a number of articles already written for that exact keyword. I found, however, that no one has written a step-by-step guide for writing blog posts.
Step 2: Brainstorming and Structuring (30 Minutes)
The first step in my brainstorming process is to craft the headline based on the primary and secondary keywords.
As you see, all of the primary and secondary keywords are worked into the headline/title tag:
A Step-By-Step Guide to Writing a Traffic-Nabbing Blog Post
I start with the headline because that gives me a scope for the content of the article.
Develop Your Subheads
With the headline nailed down, you can start structuring the blog post with subheads. Include first level and second level subheads depending on how in depth you want to be.
The first level subheads in this post are the steps, and the second level subheads act as quick scans so you can grasp the section without reading it all.
Remember, use the HTML heading tags for the subheads as I explained in 10 SEO Blog Post Publishing Steps that Most Bloggers Forget.
Step 3: Writing (3 Hours)
Out of the six hours that it takes me to create a blog post, I only spend half of it writing.
Reel Them in With the Introduction
After the headline, your introduction is the most important part of the post.
If you do a good job of capturing their attention and emphasizing the importance of reading the post, they’ll keep reading. If you don’t, they won’t.
In this post, I emphasized the importance of reading it by ending the introduction with the benefits of following this process, “tens of thousands of people every month.”
Fill Out the Subhead Sections
By writing the subheads first, writing the article becomes as simple as filling out a form with explanatory content under each subhead.
When rounding out the subhead sections, I try to include an image, a blockquote, or a list to make each section more scannable.
Wrap it Up with a Conclusion
The purpose of the conclusion is three-fold:
- To re-emphasize the main points of the post.
What do you want them to remember? How do you want them to feel? - To tie back in with the introduction.
If you dropped something creative into the introduction, bring the post full circle by mentioning it again. - To get them to take action.
I’m convinced that the best call to action is to get your reader to implement your advice. So end the post with a little ditty that’ll motivate them to do so (e.g see “The Final Word” ).
Edit for Content
At this point, read through the whole article to grasp the big picture view of the content. Make sure that it effectively communicates the message that you want your reader to take away.
You’ll edit for grammar and sentence structure later.
Step 4: Posting (30 Minutes)
Now that you’ve written the post, preferably in Word, upload it to your site in the Add Post area.
In posting the article, there are five things to keep in mind:
- Metadata
Based on your keyword research, add your meta description and keywords. - Category
Choose a category for your post. - Tags
Add tags to link to previous posts on your blog that discuss similar topics. - Excerpt
If you use excerpts in your theme, make sure you drop that in. I like to use my meta description as my excerpt. - Custom Fields
If you have custom fields built into your theme, include those.
Step 5: Editing and Accessorizing (1 Hour)
Now that you have the post on your site, we start the editing and accessorizing step:
- Edit for Grammar
Click Preview to edit the post as you’ll see it on your site. For this editing phase, focus on grammatical errors, spelling mistakes, and syntax issues. - Find a Post Image
Use Compfight.com to search through the Creative Commons section of Flickr. Find a photo you like, make sure you’re not violating any of its copyright rules, use it in your post, and attribute it back to the creator. If it’s your feature image, set it as your feature image. - Create the Supplementary Images
In Step 1, I included a supplementary screenshot of the Google Keyword results for my initial keywords. I create those images at this point and upload them into the post. - Link Internally and Externally
Link to two or three previous posts because it’s good for internal SEO and for keeping people on your site. Then, if I feel like the reader will benefit from someone else’s resource or tool (like Compfight), I’ll link to those. - Make Final Edits
Edit the post one last time with all of the images included.
Refer back to 10 SEO Blog Post Publishing Steps that Most Bloggers Forget to make sure you don’t forget anything in these two steps.
Then read 10 Blog Post Marketing Steps to Take Immediately After You Publish to know what comes next.
The Final Word
I understand that this is an extensive, time-consuming process that you might not want to go through.
I can tell you, however, that I’ve gone through this exact process for nearly every blog post I’ve written in the last three years. As a result, Google sends 20,000+ people per month to my sites (not including my Income Diary posts).
So, instead of pumping out 10-15 measly 1-hour blog posts per month that hardly get any traffic, spend a little more time writing 2-3 solid ones.
It’s better for the internet, too.
Photo by: Krazy Diamond
Related articles
 How To Make Your Next Blog Post Suck!
 How to Write a Legendary Blog Post
 10 Blog Writing Tips
 How to Come up with Killer Blog Post Ideas
 Creating Blog Posts 101
 Top Content to Write in the New Year
 6 Steps To Writing The Ultimate Top List
 The Beginner’s Guide To Blogging
 How to Write Epic Blog Posts that Rank Well
 Create A Perfect Blog Post, First Time, Every Time!
 10 Blog Post Creation Tips Every Blogger Should Follow
 20 Tips to Become a Better Online Writer